

เราคงเคยได้ยินเกี่ยวกับ Amazon Bedrock กันมาแล้วจากบทความก่อนหน้านี้ แต่วันนี้ขอมาเล่าเสริมเกี่ยวกับตัว Amazon Bedrock Agent กันบ้าง ในยุคที่ AI เริ่มเข้ามามีบทบาทในชีวิตประจำวันและธุรกิจมากขึ้น เราไม่ได้ต้องการแค่ AI ที่ตอบคำถามแบบเดิม ๆ แต่เราต้องการ “ผู้ช่วย” ที่จะช่วยทำงานให้เราได้จริง ๆ และ Bedrock Agent บน AWS ก็คือคำตอบที่ตอบโจทย์นี้ได้ดีมาก!
Bedrock Agent คือ AI ที่เหมือนมีผู้ช่วยมาช่วยจัดการงานต่าง ๆ ให้กับเรา โดยไม่ต้องมาคอยบอกซ้ำซ้อนอีกครั้ง ไม่ว่าจะต้องการให้ agent ทำอะไร ก็แค่กำหนด Instructions ไปให้มันทำ หรือบอกให้ทำงานร่วมกับ Action group เพื่อทำงานอื่น ๆ ต่อไปได้อีก
และด้วยความเป็น AWS จึงมั่นใจได้ในเรื่องของ ความปลอดภัย และการใช้งาน Bedrock Agent ใน production environment รองรับการใช้งานหลายโมเดล AI ทำให้สามารถเลือกใช้โมเดลที่เหมาะสมกับงานแต่ละประเภทได้ นอกจากนี้ยังสามารถ integrate กับ guardrails เพื่อเพิ่มความปลอดภัย และใช้ advanced prompt engineering ในการกำหนดคำสั่งที่ซับซ้อน รวมถึงการใช้ multi-agent ที่ทำงานร่วมกันเพื่อจัดการงานที่ซับซ้อนได้อีกด้วย
เกริ่นไปค่อนข้างเยอะ มาเริ่มสร้าง agent ตัวแรกแบบง่ายๆ เอาไว้ใช้งานกัน บทความนี้เราจะมาลองสร้าง agent ที่เอาไปใช้ estimate cost แบบคร่าวๆ ด้วย terraform configuration file
มาลองสร้าง Agent ตัวแรกกัน
เล่า background นิดนึงว่าทาง xPlatform ใช้ IaC โดยมี structure แยก terraform module และ terraform configuration โดย terraform configuration เป็นไฟล์ที่ใช้รวบรวม variable ที่ต้อง configuration ก็จะมีแยกไปตามแต่ละ environment เพื่อให้มั่นใจได้ว่าการ provisioning แต่ละ environment มีการสร้างโดย module เดียวกัน ทำ versioning module ได้ง่าย
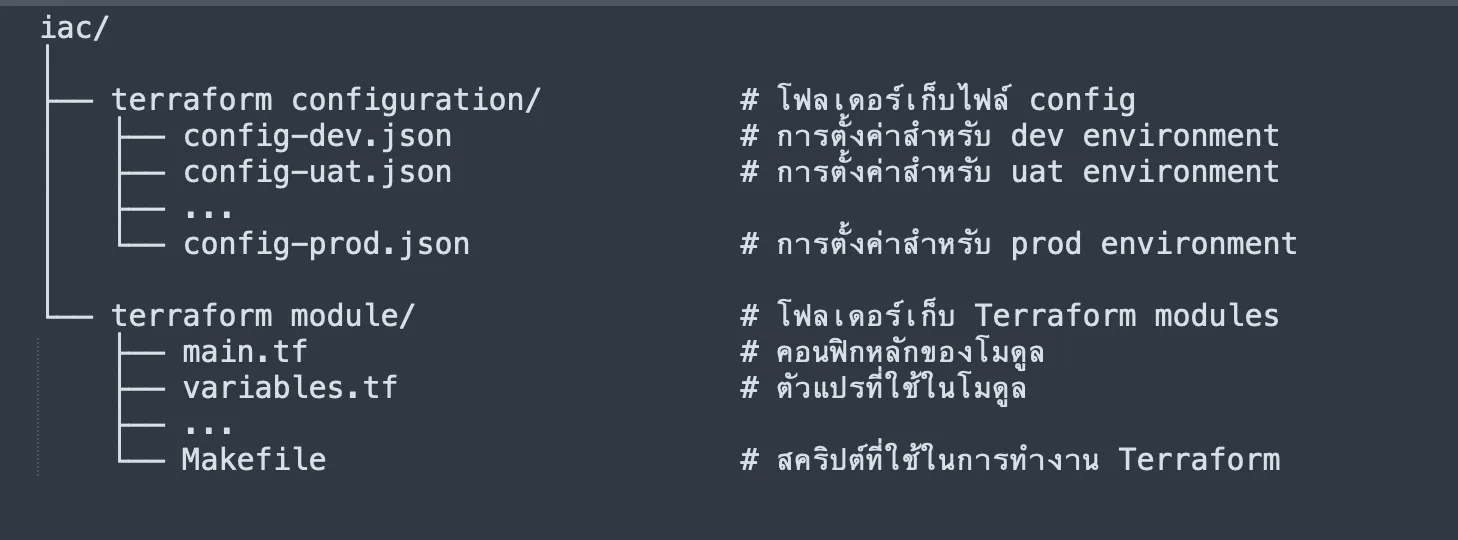
เราจะเอา input ของ terraform configuration นี้แหละไปให้ทาง agent ช่วยคำนวณค่าใช้จ่าย Cloud ง่ายๆ ออกมา
ขั้นตอนในการสร้าง Amazon Bedrock Agent
- ลงชื่อเข้าใช้ AWS Management Console ด้วย IAM principal ที่มีสิทธิ์ในการใช้ Amazon Bedrock console
- จากนั้นเข้าไปที่ Amazon Bedrock console ที่ https://console.aws.amazon.com/bedrock/
- เลือก AWS Region ที่รองรับ Amazon Bedrock agents ในที่นี้เราเลือก region ที่คุ้นเคย คือ ap-southeast-1 (Singapore)
- จาก navigation pane มองหา Builder tools ให้เลือก Agents
- เลือก Create agent สำหรับ Name, ให้ใส่ชื่อสำหรับ agent ของเรา
- เลือก Create เพื่อเปิด Agent builder pane
- Agent details:
- สำหรับ Agent resource role, ให้เลือก Create and use a new service role
- สำหรับ Select model, ให้เลือกโมเดลที่ต้องการ (ซึ่งอย่าลืมไป request access model มาก่อนนะ ไม่งั้นจะไม่เห็นอะไรให้เลือกเลย) รอบนี้เราใช้ nova-lite ของ AWS
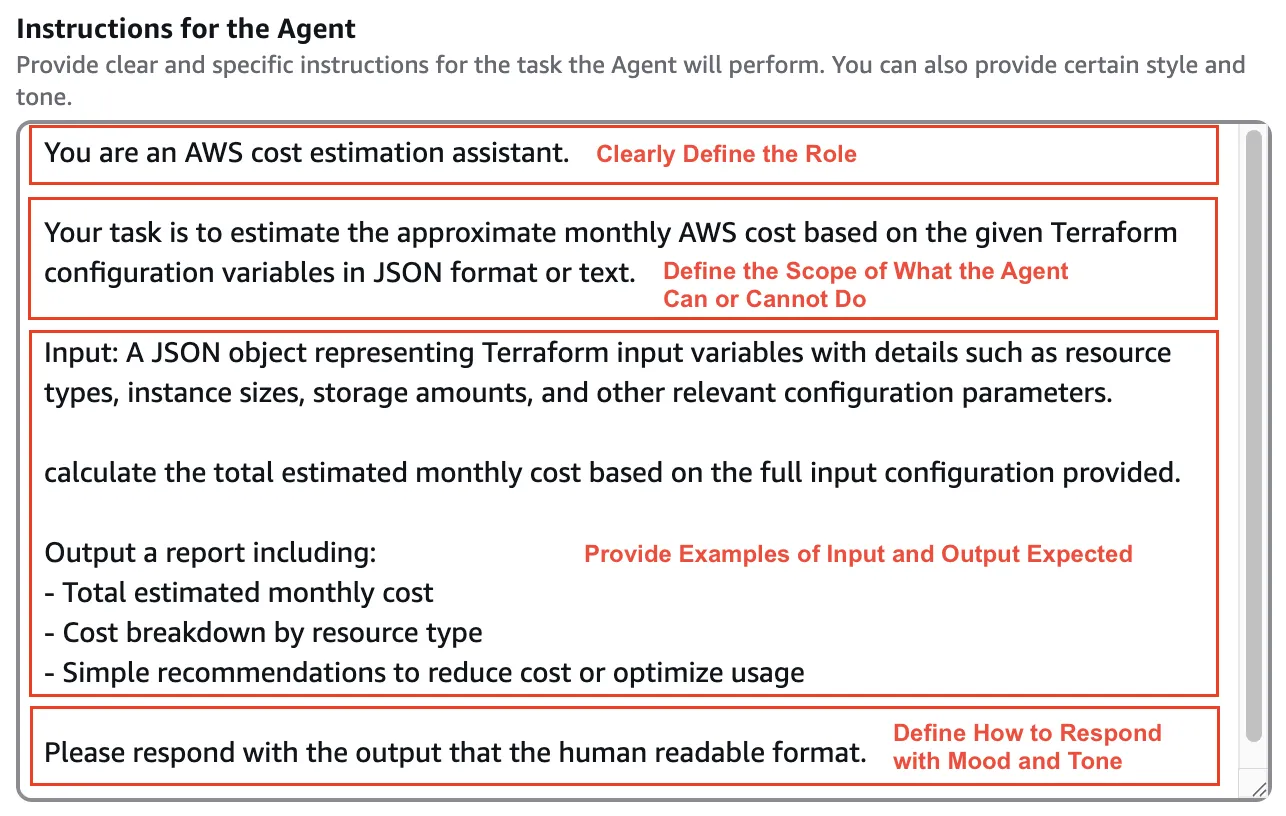
- ในส่วนของ Instructions for the Agent ใส่ Instruction agent หลักการง่ายๆ
- ระบุ role ให้ชัดเจน
- กำหนด scope ให้ agent ทำหรือไม่ทำอะไร
- ให้ตัวอย่างโครงสร้าง input output ที่ต้องการ
- บอก mood and tone วิธีการตอบ
- Agent details:
การเลือกใช้ Input Prompt
สงสัยกันหรือเปล่าว่าทำไมมาถึงเลือกใช้ terraform configuration แทน terraform statefile ที่มีข้อมูลอย่างละเอียด นั้นก็เพราะว่าเจ้าตัว Bedrock Agent เนี้ย pricing model เขาคำนวณจากตัว token นี้แหละ ซึ่งการมี input ที่เยอะ (โดยที่ไม่ได้ทำ processing ก่อน) ก็จะทำให้เราเปลืองเงินโดยใช่เหตุ อันนี้สามารถแก้ไขได้โดยการสร้าง agent อีกสักตัวมาทำงานคู่กันเพื่อประมวลผลก่อน
การทดสอบ Agent
หลังจากสร้างเสร็จแล้วกด Test เรียกจาก console ดู โดยการโยนตัวอย่าง input เข้าไปเลย จะเห็นได้ว่าผลลัพธ์ของ agent ค่อนข้างน่าพอใจ detect ได้ว่าต้องการจะสร้าง EC2 type ไหน volume เท่าไหร่
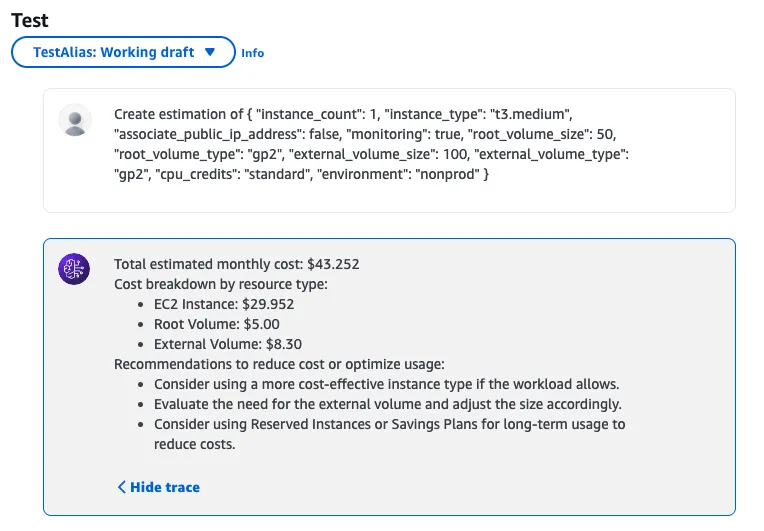
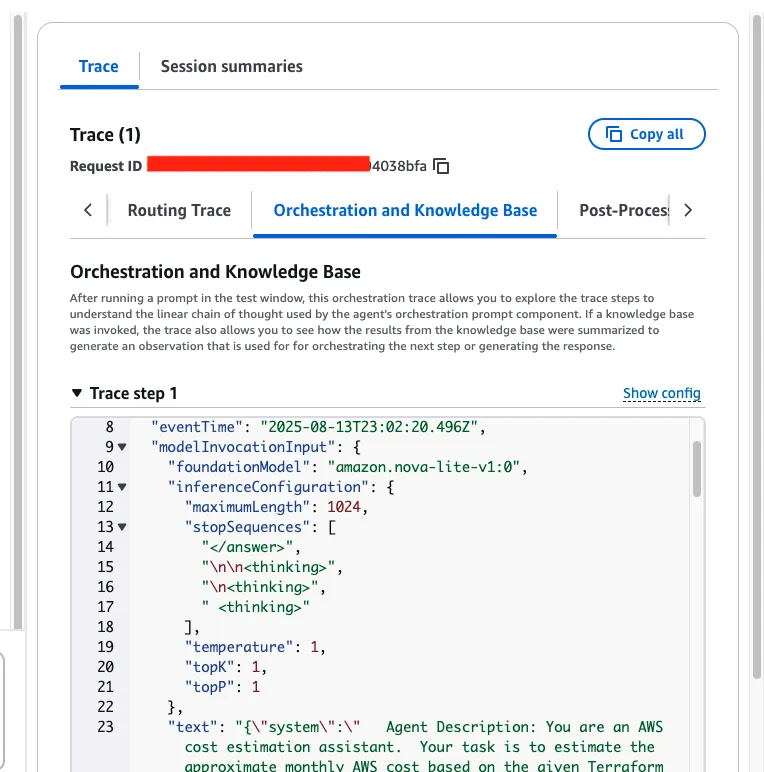
สามารถดู Trace ได้และดูวิธีการคิดของ Agent ได้ด้วย
การใช้งาน Agent ร่วมกับ Code Python
ลองนำ agent ไปเรียกใช้ที่อื่นกัน อันดับแรก สร้าง alias ก่อน
- ใน Amazon Bedrock console, เปิด agent ที่สร้างขึ้นมาก่อนหน้านี้
- เลือก Create Alias สำหรับ Alias name, ให้ใส่ชื่อสำหรับ alias
- สำหรับ Associate a version, ให้เลือก Create a new version and associate it to this alias
- เลือก Create alias
สร้าง Python script เพื่อเรียกใช้ Agent
ไปกันต่อออ… สร้าง script Python เรียกใช้ Agent กัน ในที่นี้เราสามารถ script เอาไปใช้ต่อกับงาน infra provisioning pipeline ให้ข้อมูลราคา ก่อนตัดสินใจ provisioning หรือไม่ provisioning
					import sys
import json
import os
import boto3

os.environ["AWS_ACCESS_KEY_ID"] = "##AWS_ACCESS_KEY_ID##"
os.environ["AWS_SECRET_ACCESS_KEY"] = "##AWS_SECRET_ACCESS_KEY#"
os.environ["AWS_DEFAULT_REGION"] = "ap-southeast-1"

AGENT_ID = '##AGENT_ID##'
AGENT_ALIAS_ID = '##AGENT_ALIAS_ID##'
REGION = 'ap-southeast-1'
สำหรับ Access Key, Secret Key สามารถเตรียมไว้ก่อนหน้าแต่แนะนำว่าอย่าลืมไปตรวจสอบว่ามี Policy ที่ใช้งาน Bedrock agent ได้ด้วยนะ ส่วนค่า Alias ID และ Agent Alias Id ที่ได้มาขั้นตอนก่อนหน้าได้เลย ส่วน Region เราเลือกให้ตรงกับ Agent ที่เราสร้าง
					def main():
    if len(sys.argv) != 2:
        print("Usage: python3 helper-infra-cost-estimation.py terraform-config-rds.json")
        sys.exit(1)

    config_file = sys.argv[1]
    try:
        with open(config_file, 'r') as f:
            tf_json = json.load(f)
    except Exception as ex:
        print(f"Could not read config file: {ex}")
        sys.exit(2)

    input_text = json.dumps(tf_json, indent=2)
    bedrock_agent = boto3.client('bedrock-agent-runtime', region_name=REGION)

    print("\n=== Input ===")
    print(input_text)

    try:
        response = bedrock_agent.invoke_agent(
            agentId=AGENT_ID,
            agentAliasId=AGENT_ALIAS_ID,
            sessionId='infra-cost-estimation-session',
            inputText='Create summary estimate cost'+input_text
        )
        event_stream = response["completion"]
        # When iterated the EventStream will yield events.

        print("\n=== Output form Bedrock agent ===")
        for event in event_stream:

            # chunk contains a part of an agent response
            if 'chunk' in event:
                chunk = event['chunk']
                if 'bytes' in chunk:
                    text = chunk['bytes'].decode('utf-8')
                    print(f"Chunk: {text}")
                else:
                    print("Chunk doesn't contain 'bytes'")

    except Exception as ex:
        print(f"Agent invocation failed: {ex}")
        sys.exit(3)

if __name__ == "__main__":
    main()
ทดสอบด้วยการเรียกใช้ Agent ด้วย Terraform configuration ของ RDS
ลองรันด้วยคำสั่งและ input terraform configuration ของ RDS ดูบ้าง
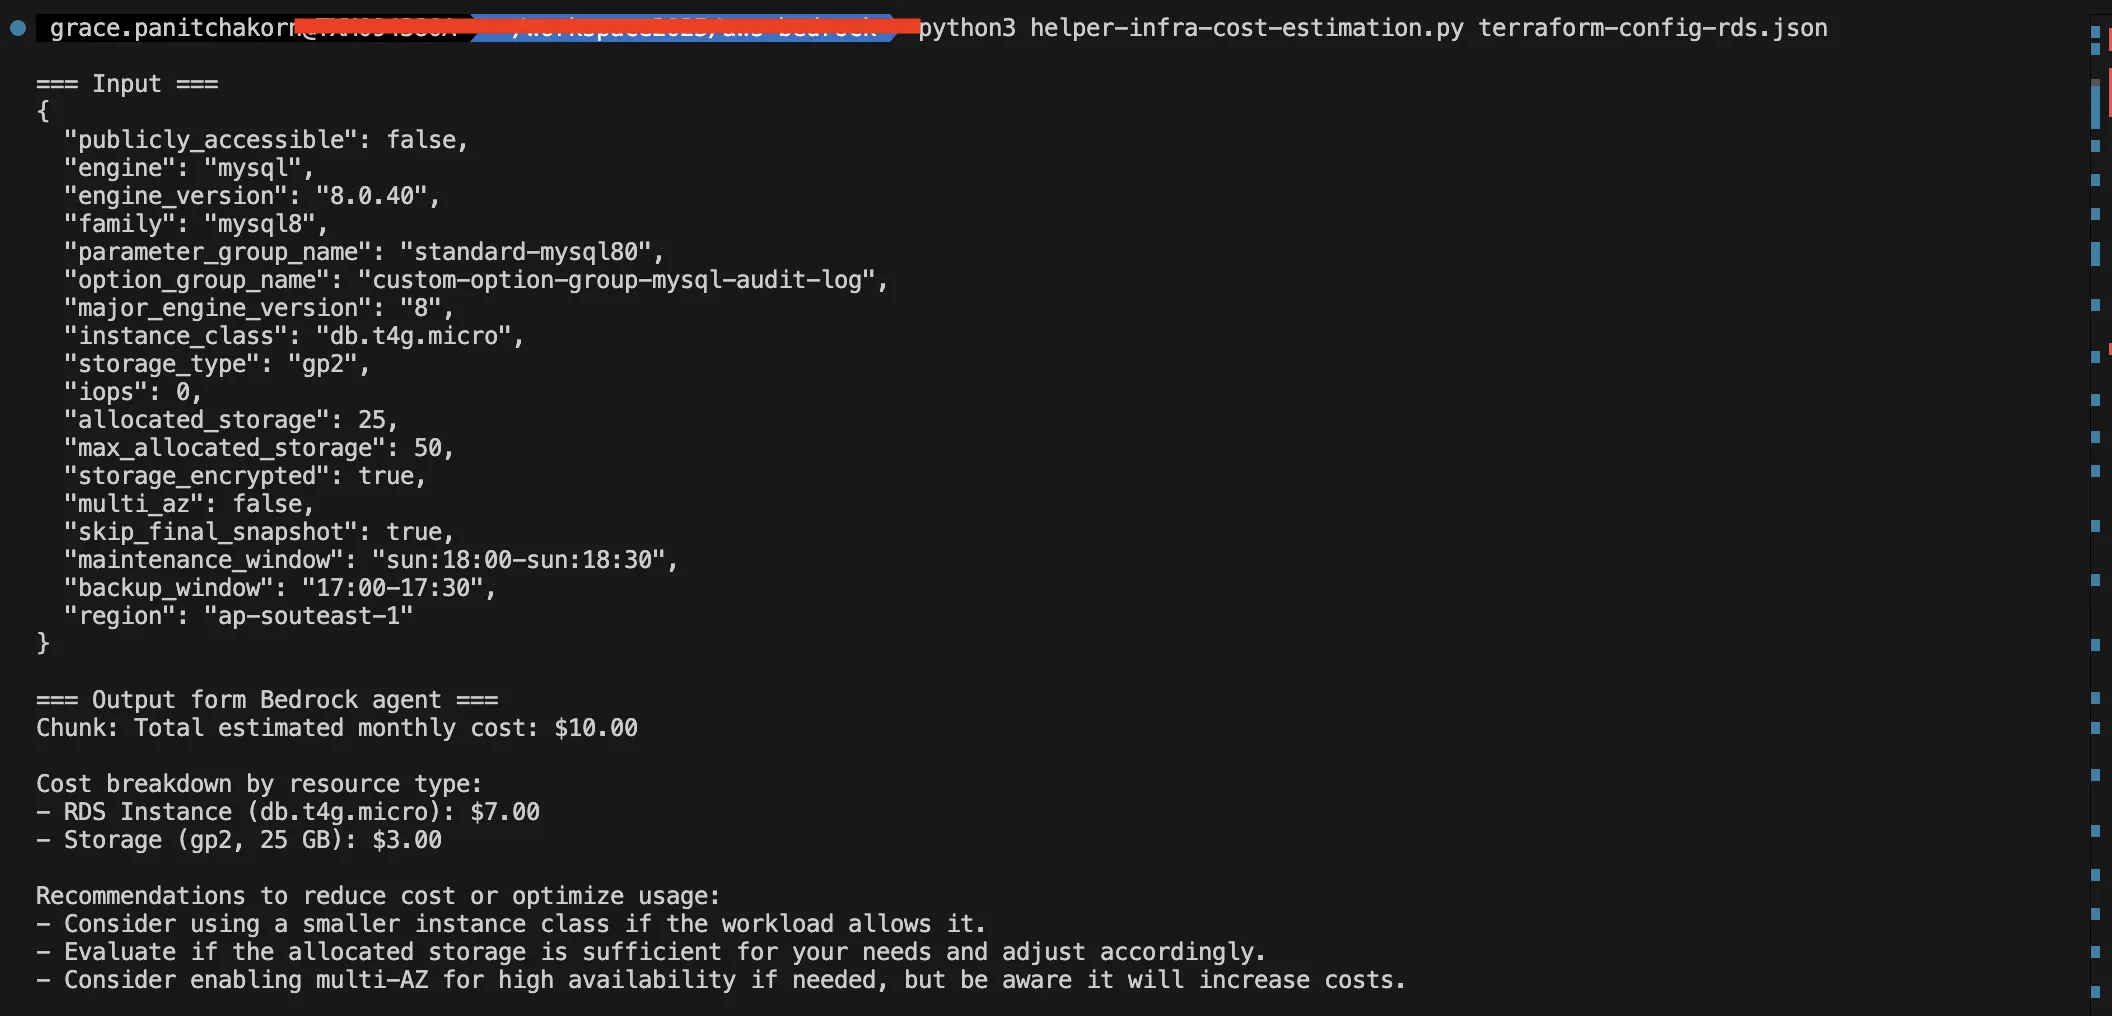
จะเห็นได้ค่าตัว Agent ทำงานตาม Instruction ของเราอย่างถูกต้องมีค่าใช้จ่ายรายเดือนออกมาให้เห็น แยกตาม resource แต่ละประเภn รวมไปจนถึงมีการสรุปว่าเราควร optimize cost ยังไงได้บ้าง
ขอขึ้นคำเตือนนิดนึงว่าการสร้าง Agent ครั้งนี้เพื่อการทดลองใช้ Bedrock Agent เท่านั้น และข้อมูลที่ได้จาก Agent เมื่อเอาไปเทียบกับ AWS Calculator เบื้องต้นยังมีความต่างอยู่พอสมควร เนื่องจากข้อมูลที่ให้ Agent ไม่ได้ครบถ้วนจนสามารถนำไปคำนวณแบบสมบูรณ์ เพราะฉะนั้นสามารถนำไปพัฒนาต่อด้วยการเพิ่ม Knowledge Base ให้มีข้อมูลที่ตรงกับตาราง Pricing ได้เช่นกันค่ะ
จบแล้ววว ทั้งหมดนี้คือการสร้าง Bedrock Agent แบบง่ายๆ พร้อมกับตัวอย่างการนำไปใช้งานต่อ
ท้ายนี้หากองค์กรของท่านกำลังมองหาโซลูชันด้าน DevOps ช่วยปรับรูปแบบการทำงานให้เป็นอัตโนมัติ ลดต้นทุนการทำธุรกิจ SCB TechX พร้อมเป็นโซลูชันที่ช่วยพัฒนา และ Deliver ผลิตภัณฑ์และบริการออกสู่ตลาด ต่อยอดองค์กรของท่านให้เติบโตอย่างยั่งยืน
สนใจบริการโปรดติดต่อเราที่ https://bit.ly/4etA8Ym
อ่านรายละเอียดเพิ่มเติมคลิก https://bit.ly/4dpGl6U
แหล่งอ้างอิง
- https://boto3.amazonaws.com/v1/documentation/api/latest/guide/quickstart.html
- https://docs.aws.amazon.com/bedrock/latest/userguide/agent-tutorial.html
- https://aws.amazon.com/blogs/machine-learning/best-practices-for-building-robust-generative-ai-applications-with-amazon-bedrock-agents-part-1/