

We’ve probably already heard about Amazon Bedrock from previous articles, but today I want to dive deeper into Amazon Bedrock Agent. In this era where AI is increasingly playing a role in daily life and business, we don’t just need an AI that answers questions like before; we need an “assistant” that can help us with real tasks. And Bedrock Agent on AWS is the perfect solution for that!
Bedrock Agent is an AI that acts as a helper, managing tasks without us needing to repeatedly tell it what to do. Whether you need the agent to do something, you just set the instructions, or tell it to work with an action group to perform additional tasks.
With AWS’s security, we can be confident that Bedrock Agent can be used in a production environment. It supports multiple AI models, so you can choose the model that best fits each task. Additionally, you can integrate with guardrails for enhanced security, use advanced prompt engineering for complex instructions, and even employ multi-agent systems to manage more complex tasks.
After all this introduction, let’s start by creating a simple agent for use. In this article, we will create an agent to estimate cost using a terraform configuration file.
Let’s create our first Agent
A bit of background: xPlatform uses IaC with a structure separating terraform modules and terraform configuration files. The terraform configuration file gathers all the necessary variables and is separated by environment to ensure that provisioning across different environments is done with the same modules, making it easier to manage module versions.
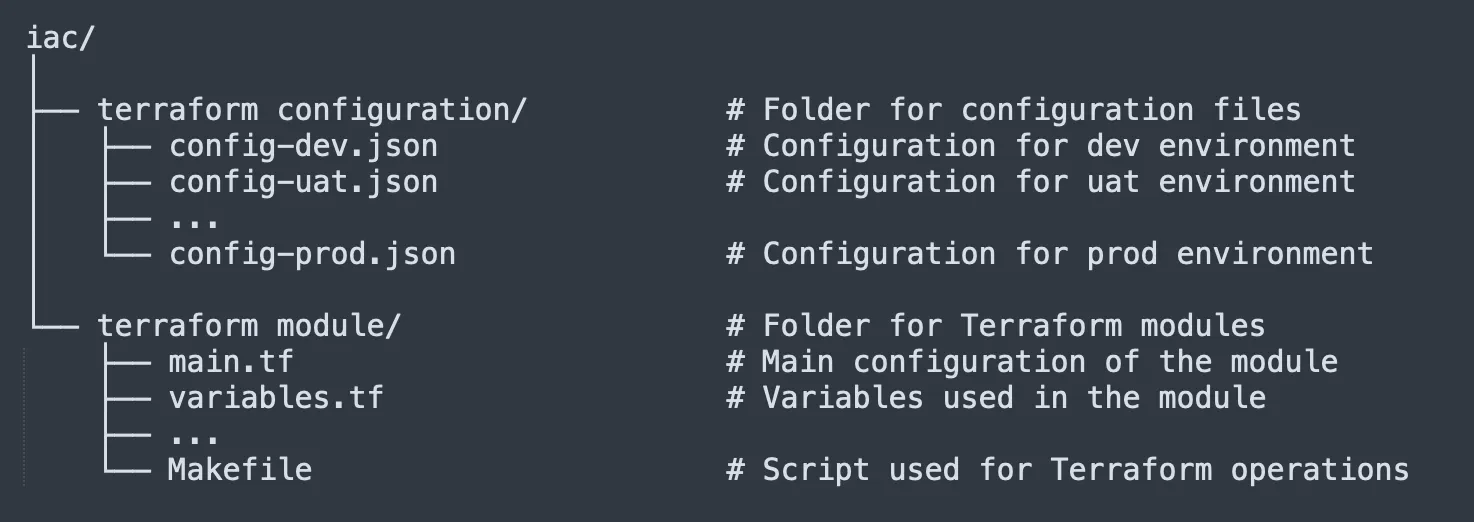
We’ll take the terraform configuration input and let the agent estimate it simply.
Steps to create an Amazon Bedrock Agent
- Log in to the AWS Management Console with an IAM principal that has access to the Amazon Bedrock console
- Then go to the Amazon Bedrock console at https://console.aws.amazon.com/bedrock/
- Select an AWS Region that supports Amazon Bedrock agents. For this example, we choose the region ap-southeast-1 (Singapore)
- From the navigation pane, find Builder tools and select Agents
- Click Create agent. For Name, enter a name for your agent
- Click Create to open the Agent builder pane
- Agent details:
- For Agent resource role, select Create and use a new service role
- For Select model, choose the model you want (don’t forget to request access to the model first, or you won’t see any options). For this case, we are using nova-lite from AWS.
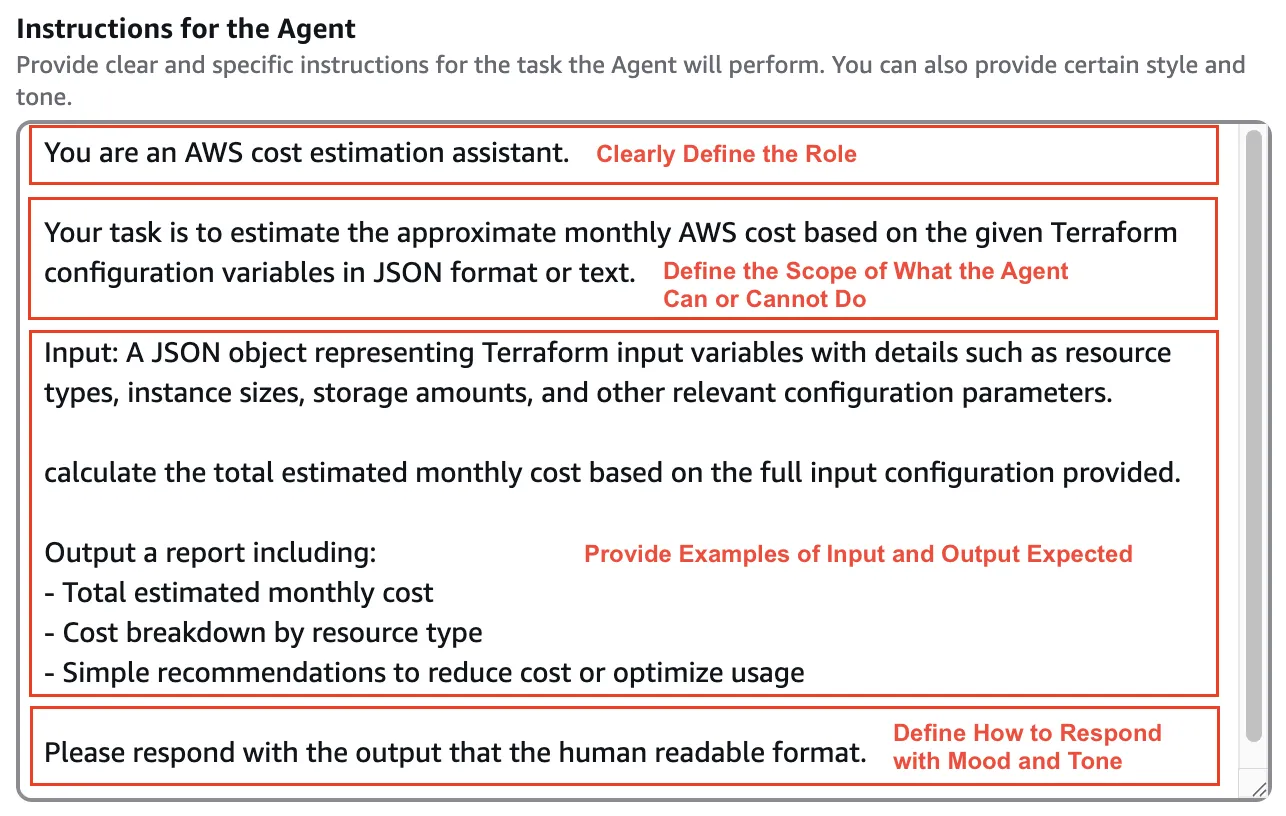
- In the Instructions for the Agent section, provide simple instructions for the agent
- Clearly define the role
- Set the scope of what the agent can or cannot do
- Provide example input-output structures
- Specify how the agent should respond in terms of mood and tone
- Agent details:
Choosing the Input Prompt
You might wonder why we are using the terraform configuration instead of the terraform statefile that contains detailed information. The reason is that the Bedrock Agent pricing model calculates based on tokens. Having more input (without processing it first) will increase costs unnecessarily. This can be solved by creating another agent to process the data first before sending it to the main agent.
Testing the Agent
After creating the agent, click Test from the console. You can feed in example inputs and see that the agent can detect what EC2 type and volume size are needed.
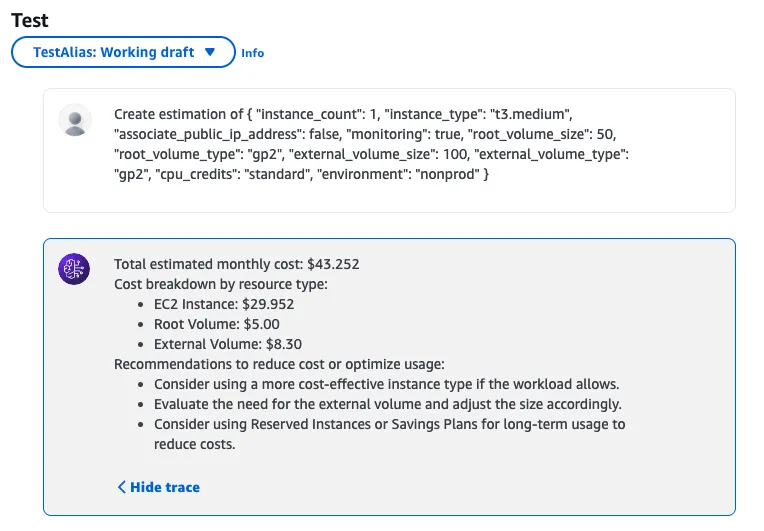
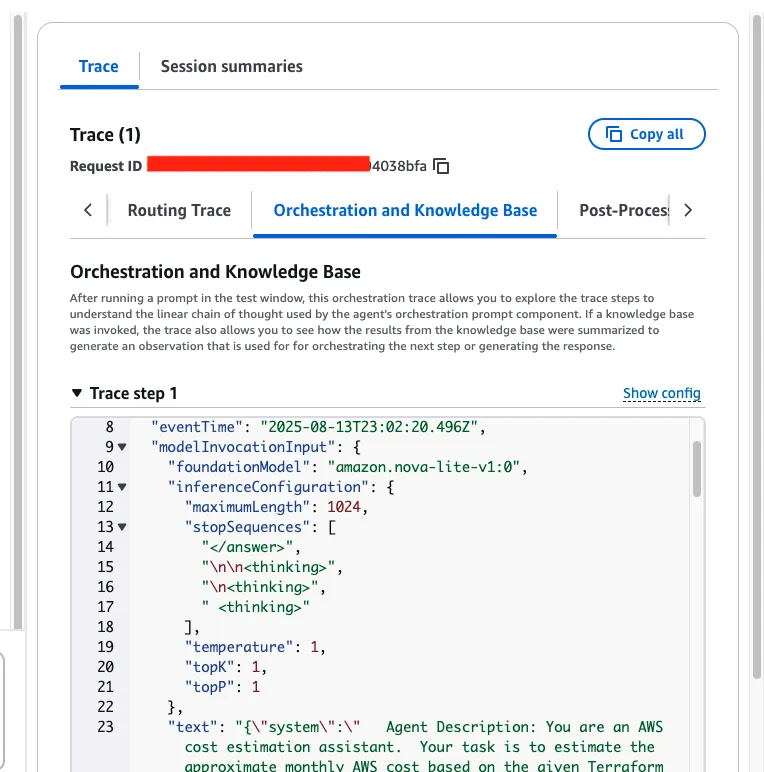
You can also view the Trace to see how the agent arrived at its conclusions.
Using the Agent with Python Code
Let’s try calling the agent from another service. First, create an alias:
- In the Amazon Bedrock console, open the agent you just created
- Click Create Alias. For Alias name, enter a name for the alias
- For Associate a version, select Create a new version and associate it to this alias
- Click Create alias
Creating a Python Script to Call the Agent
Next, let’s create a Python script to call the agent. This script can be integrated into an infrastructure provisioning pipeline to provide cost estimates before deciding to provision resources.
					import sys
import json
import os
import boto3

os.environ["AWS_ACCESS_KEY_ID"] = "##AWS_ACCESS_KEY_ID##"
os.environ["AWS_SECRET_ACCESS_KEY"] = "##AWS_SECRET_ACCESS_KEY#"
os.environ["AWS_DEFAULT_REGION"] = "ap-southeast-1"

AGENT_ID = '##AGENT_ID##'
AGENT_ALIAS_ID = '##AGENT_ALIAS_ID##'
REGION = 'ap-southeast-1'
For the Access Key and Secret Key, you can prepare them in advance, but it’s recommended to verify that there is a policy allowing access to the Bedrock agent. You can use the Alias ID and Agent Alias ID obtained from the previous step. As for the Region, make sure to choose the one that matches the Agent you created.
					def main():
    if len(sys.argv) != 2:
        print("Usage: python3 helper-infra-cost-estimation.py terraform-config-rds.json")
        sys.exit(1)

    config_file = sys.argv[1]
    try:
        with open(config_file, 'r') as f:
            tf_json = json.load(f)
    except Exception as ex:
        print(f"Could not read config file: {ex}")
        sys.exit(2)

    input_text = json.dumps(tf_json, indent=2)
    bedrock_agent = boto3.client('bedrock-agent-runtime', region_name=REGION)

    print("\n=== Input ===")
    print(input_text)

    try:
        response = bedrock_agent.invoke_agent(
            agentId=AGENT_ID,
            agentAliasId=AGENT_ALIAS_ID,
            sessionId='infra-cost-estimation-session',
            inputText='Create summary estimate cost'+input_text
        )
        event_stream = response["completion"]
        # When iterated the EventStream will yield events.

        print("\n=== Output form Bedrock agent ===")
        for event in event_stream:

            # chunk contains a part of an agent response
            if 'chunk' in event:
                chunk = event['chunk']
                if 'bytes' in chunk:
                    text = chunk['bytes'].decode('utf-8')
                    print(f"Chunk: {text}")
                else:
                    print("Chunk doesn't contain 'bytes'")

    except Exception as ex:
        print(f"Agent invocation failed: {ex}")
        sys.exit(3)

if __name__ == "__main__":
    main()
Testing with RDS Terraform Configuration
Try running the script using an input terraform configuration for RDS to see the results.
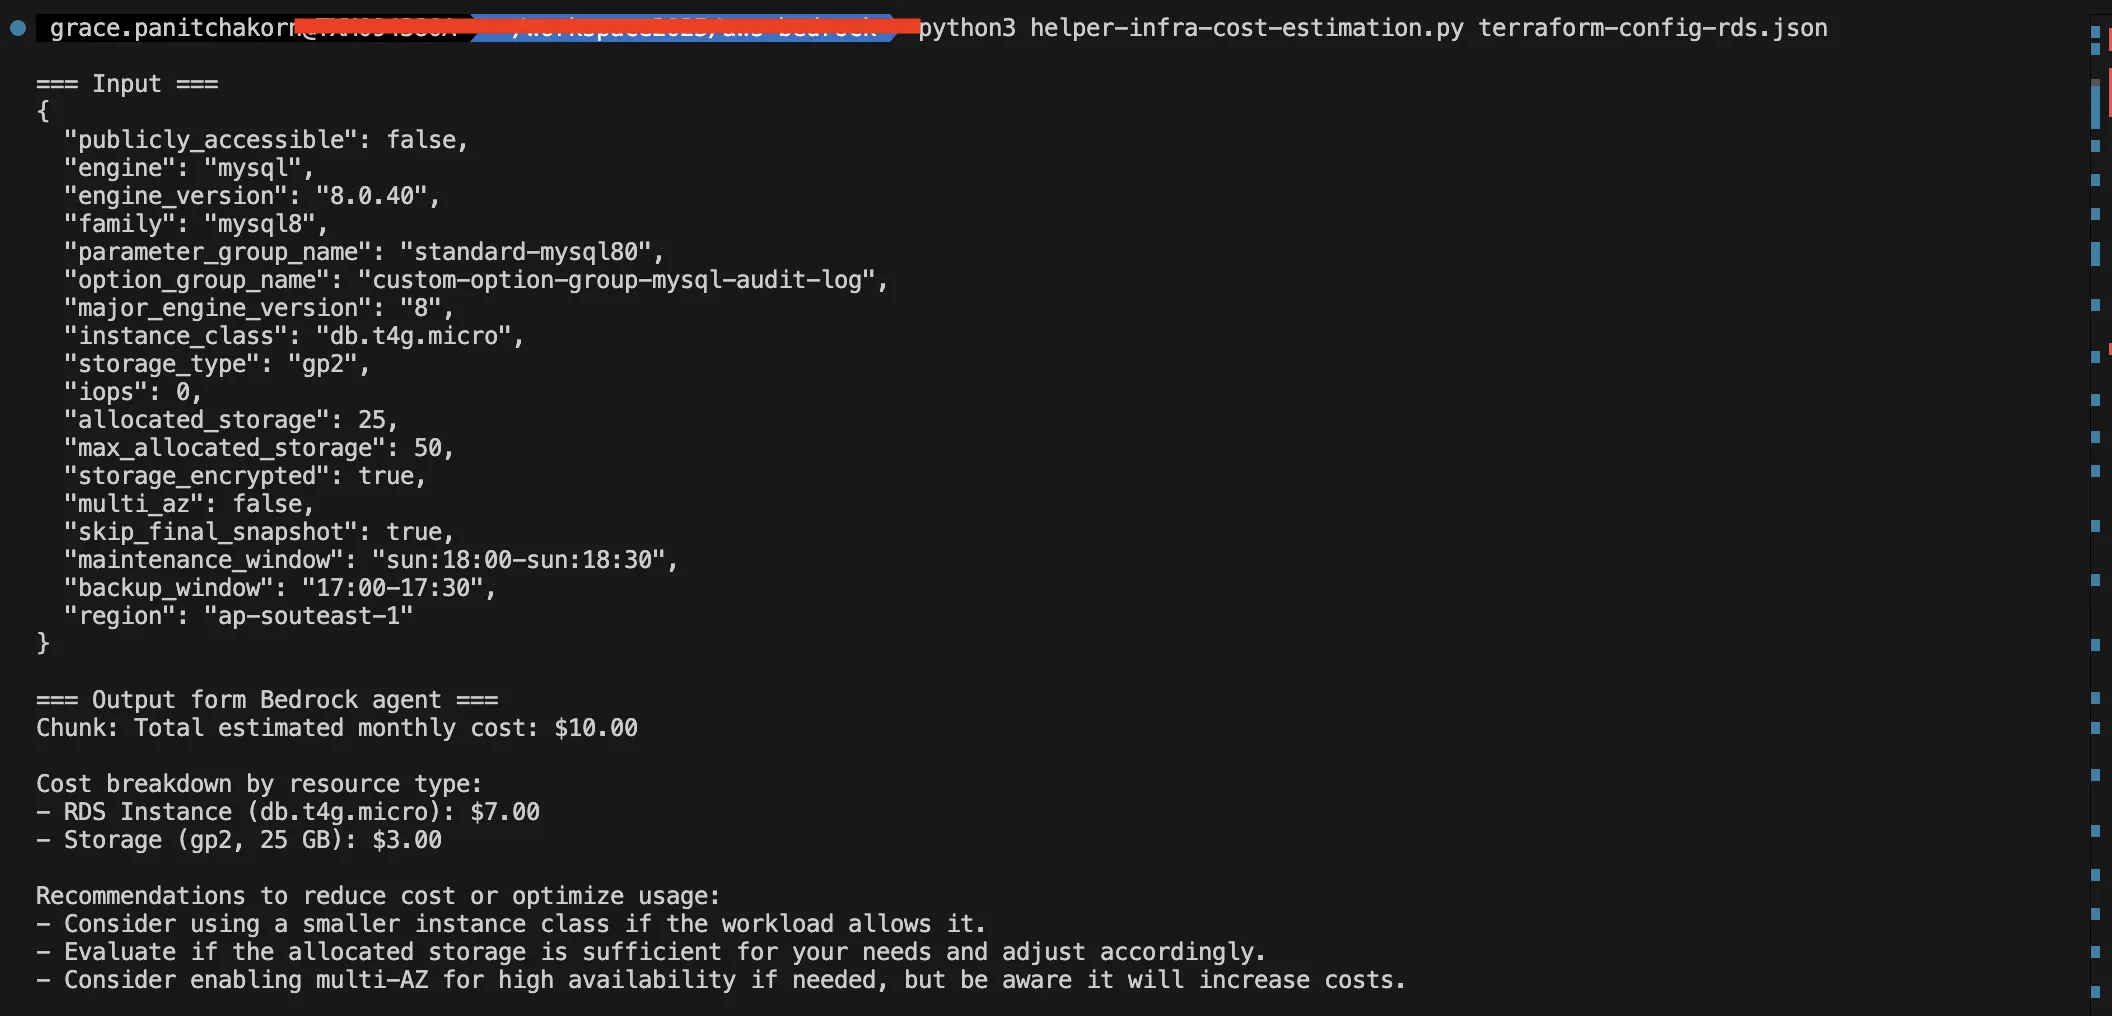
You will see that the Agent operates according to our instructions correctly, with monthly costs displayed, broken down by each resource type. It will also provide a summary of how we can optimize costs.
This agent creation is for testing purposes only with the Bedrock Agent. The data obtained from the agent, when compared to the AWS Calculator, may show significant discrepancies as the information provided to the agent is not complete enough to fully align with the AWS Pricing Calculator. Further development can be done by expanding the Knowledge Base to include accurate data that aligns with the pricing tables.
And that’s it! This is how you create a Bedrock Agent with a simple example.
Looking for a DevOps solution that automates your workflow and reduces business costs? SCB TechX helps you modernize your delivery pipeline and bring high-quality products to market faster, building a foundation for long-term growth.
For service inquiries, please contact us at https://bit.ly/4etA8Ym
Learn more: https://bit.ly/3H7W9zm
Reference:
- https://boto3.amazonaws.com/v1/documentation/api/latest/guide/quickstart.html
- https://docs.aws.amazon.com/bedrock/latest/userguide/agent-tutorial.html
- https://aws.amazon.com/blogs/machine-learning/best-practices-for-building-robust-generative-ai-applications-with-amazon-bedrock-agents-part-1/